HALLOWEEN!
Halloween is one of my favorite holidays. It's one of the few holidays that really inspires my creativity and that I have always loved. Even though most trick-or-treating nights throughout my childhood entailed wearing a winter coat over my costume or begging my mom to let me be the Little Mermaid but instead having her dress me up as a clown, I still have fond memories of Halloween. Perhaps this is because Hocus Pocus is one of my favorite movies, or maybe all the sugar induced comas I put myself in after eating half a pillowcase worth of candy helped block out any bad memories. Either way, I freaking love Halloween. Since I enjoy Halloween so much I decided bring you a mega-sized post dedicated to Halloween themed ideas.
To get started, turn on this Halloween playlist: (please note that some of these songs might not be suitable for children)
DIY Halloween Decorations and Crafts
Below are a few of the decorations I made this year. Most of these crafts are customizable and are meant to be tailored to your own imagination!
- Spooky Mason Jar Luminaries
- Ghostly Pumpkin Chain
- Hanging Owl Lantern
- Popsicle Stick Haunted House
- Pirate Hanging Door Sign
Spooky Mason Jar Luminaries
These luminaries were easily created with some mason jars and acrylic paint. Paint each jar your favorite Halloween theme, add a tea-light candle and you have an instant luminary! I used two different sizes of jars for some variation. Right now these are on my mantle and I like to light them at night. But I plan to set them out on the porch on Halloween to welcome trick-or-treaters! One word of advice: the jars painted entirely black did not let enough light through and thus do not "glow" the way I intended them to. And yes, the two on the end are Batman themed. I just printed off a Bat-Symbol and made my own stencil.
Ghostly Pumpkin Chain
All this little craft required was some construction paper, a hot glue gun, and some Halloween shaped cookie cutters. But you could also draw your own template and use a glue stick. I put together this chain, added the ghost faces, wrote "Boo!" on the pumpkins, hung it up, and then added the decorative spider wire that I had been looking for a way to use.Hanging Owl Lantern
 |
| An individual side |
- brown paper bag
- orange tissue paper
- hot glue
- scotch tape
- black sharpie
- lantern and owl template (here)
- hole punch
- yarn, string, or twine (your preference)
Popsicle Stick Haunted House
This is perhaps my most ambitious project of the year and one for which I have no explanation. Essentially, I started making Halloween crafts and decided that I needed to use popsicle sticks some how, some way. So I came up with this idea of making a haunted house. It sounded much easier in my head than it turned out to be. I'm not going to detail how I put together the house but instead just tell you this: I used popsicle sticks (of varying sizes), hot glue, a little construction paper, and acrylic paint. Good luck.
Skull Hanging Door Sign
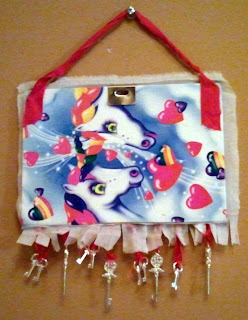
By far the most random craft I've put together this year, it's also one of my most favorite. A few years back I had plans to be a pirate for Halloween so I purchased a bunch of pirate themed craft supplies to adorn an outfit with. I did not end up being a pirate and recently discovered the bag full of all my pirate themed craft supplies. So I decided to use them! I took a skirt that I haven't worn in....ever, and cut out some pieces. The skirt had two layers of fabric in perfect colors so I layered them on top of each other but only glued the top edge first so I could still attach the keys to the bottom. I frayed the edges and then applied an iron-on rhinestone skull and crossbones. Then, I needed something substantial to glue the bottom layer to for sturdiness. After digging through some boxes in my basement, I found an old diary from when I was about 7 and removed the cover to use as backing. As a result, the back of the sign is this, which anyone who has ever had an inexplicable love for Lisa Frank can appreciate :I dug around the house looking for something to use to attach the skeleton key charms and ended up with red satin gift wrapping ribbon. I threaded the ribbon through the keys and glued them between the layers in a staggered position. I attached the last bit of ribbon at the top to allow for hanging. The whole thing took me an hour or two. And most of that time was trying to find supplies in my own house. I'm quite pleased with the result. Again, here's what I used:
- Iron-on rhinestone skull and crossbones
- Skeleton key charms (large and small)
- Two varying colors of fabric, your choice
- Red satin ribbon
- Hot glue
- The cover off your favorite childhood diary
- Scissors
- An iron (for the skull and crossbones)


No comments:
Post a Comment